For convenient placement of household appliances and lighting fixtures, an outlet block is often used. It has 2 to 5 power points. The installation of the kit is not difficult if the master has the skills. Even a beginner can handle the job.
Socket block design
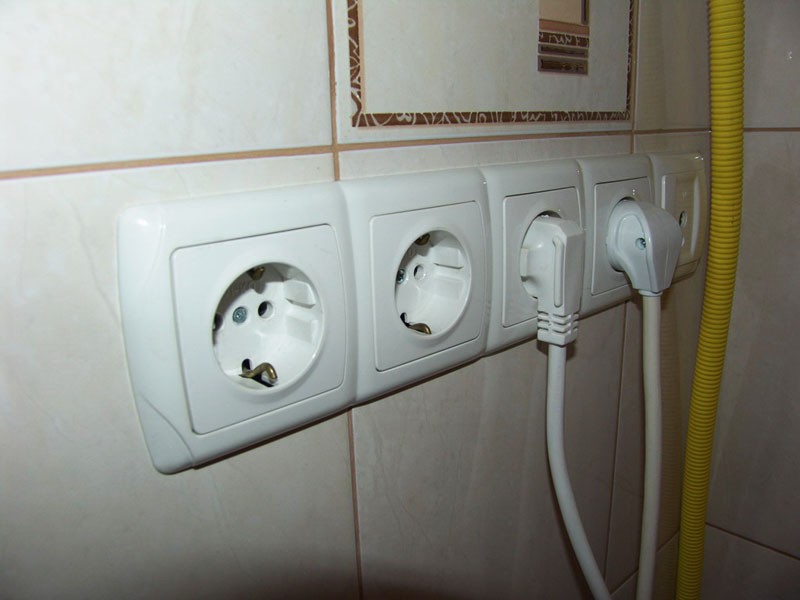
A complete set for the installation of power points has the following design:
- set of socket boxes;
- the polymer panel itself with 2-4 sockets located on it.
The dimensions of one are equal to 72x72 mm. Respectively:
- two points in a row - 142 mm;
- three - 212 mm;
- four - 284 mm.
Knowing these parameters is necessary in order to correctly determine the installation point of the socket strip (distance from the wall or window). More often it is placed in such places:
- Kitchen. Typically, power points are installed above the work surface, 40 cm (minimum) from the sink.
- Living room. So that the outlets are not visible, they can be removed behind the TV cabinet or under the bar counter.
- Bathroom. Here the entire structure can be located behind a built-in wardrobe. Thus, the food points will be hidden from the eyes and moisture by the furniture doors.
It is advisable to raise the sockets from the floor to a level of 60 cm and higher.
Connection methods

There are two ways to connect power points to the power cable:
- Loop. Implies powering each outlet from one line. The advantage of this method is the minimum labor intensity of the process. Minus - failure of all power supply points, provided the slightest damage to the cable at least in one of them. The maximum load for a daisy-chained unit is 16 A.
- Combined. A newer way to connect multiple outlets at the same time. It implies laying two cables at once from a junction box. The first type of loop feeds three of the four outlets. The second one is intended for 4 food points and can serve more powerful equipment (kitchen stove). The main advantage of such a connection is that the rest of the unit's sockets are insured against failure in case of problems with "strong" equipment and power points for it. Of the minuses, the masters distinguish the laboriousness of the process and the doubled consumption of the electrical cable.
Both types of connection can be laid in a closed (in grooves) and open (in PE channels) method. The latter option is additionally protected from mechanical stress by cable channels or a plinth with internal grooves.
Preparing for installation

In order for each block outlet to be installed correctly, you need to prepare the following materials:
- panel with the required number of power points;
- decorative strip;
- wiring cable with the required footage - measured from the junction box along all vertical and horizontal strobes to the point of location of the structure;
- jumper wire;
- alabaster or gypsum (you can putty).
From the tools you need to prepare:
- building level or ruler;
- pencil;
- perforator with a crown for concrete and drywall with a diameter of 70 mm;
- chisel, hammer;
- electrical tools;
- putty knife;
- container for mixing putty (gypsum, alabaster).
It is advisable to perform noisy work on a weekday from 10:00 to 17:00, when most of the neighbors are outside the house.
DIY installation of an outlet block
All steps for installing a group of power points are performed in strict sequence.
Wall markings
Perform using a building level or a ruler with a marker. Future channels should be located only vertically or only horizontally. It is forbidden to make oblique grooves under the cable laying. It is important to accurately mark the places for the installation of socket outlets. Between their central parts must be strictly 72 cm. Otherwise, the boxes will not fit into place.
Gutting
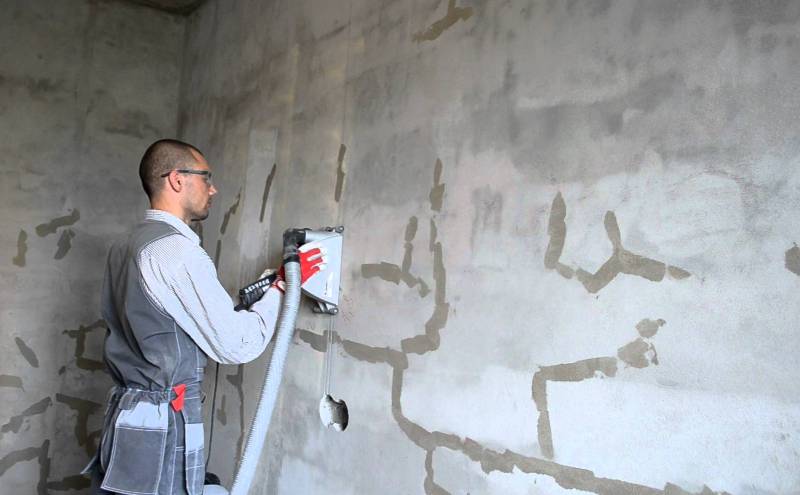
The preparation of channels for laying the cable can be done with a perforator, grinder, chisel with a hammer. Each master chooses a method for himself, depending on the availability of this or that instrument.
The principle of forming a groove looks like this:
- A cut is made along the marking line with a grinder on both sides. If the master works with a punch, holes are made in steps of 1.5-2 centimeters along the line.
- With the help of a hammer and chisel, excess concrete is knocked out of the wall, forming channels for laying the wiring.
- Technical recesses for the installation of socket outlets are made with a perforator with a crown. Here, concrete is also cut, and then the excess is knocked out with a chisel and hammer. If necessary, select the depth of the excavation. Periodically insert the socket into the concrete, checking how much its edges protrude above the plane of the wall. Some deepening of the elements inward is considered the norm. Later, the excess free space will be filled with building mixture.
When carrying out dirty work, it is advisable to use a respirator to protect the respiratory tract from construction dust. The use of protective glasses is also important.
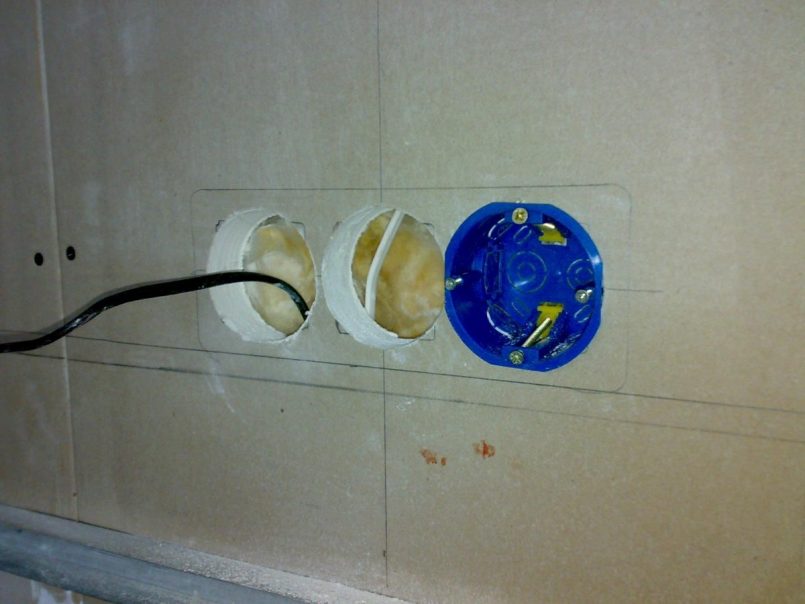
Installation of socket boxes

To install a set of socket outlets, it is advisable to buy special plastic glasses for them. The elements are fixed in the nests using alabaster or gypsum mortar. It is prepared from bulk material, mixed with water in a ratio of 4: 1. The consistency should look like thick sour cream.
The ready-made solution is laid in a nest of a concrete wall and, releasing wires into the technical gaps of the glasses, they are mounted into the wall. It is important to monitor the evenness of the installation of the glasses using a level. It is unacceptable if they protrude above the plane of the wall. With the help of the remnants of the building mixture, the wall around the future block is maximally aligned.
The solution sets in about 2-4 hours. To be sure, you can give it a day to dry.
Features of installing socket blocks in drywall
If you need to build an invoice socket into a plasterboard wall, less labor can be applied here. The socket block has special legs that you just need to press against the GKL box on the sides. In turn, the outer ledge-rim of the glass simply will not allow it to fall inward. If, in the future, it is planned to clad the wall with tiles, it is necessary that the element protrude above the plane of the wall by the thickness of the cladding material.
At the time of the formation of the nest under the glasses, it is advisable not to press hard on the wall, so as not to break it. Drywall is a relatively fragile material.
If there is not enough space between the wall and the drywall slab, you will have to carefully deepen the concrete or brickwork at the location of the block.
Electrical connection

After the solution has dried, start connecting the cable to the sockets. With the loopback method, they act as follows:
- The cable assembled from the junction box is led into the first socket. Its braid must first be stripped with a knife or side cutter 10-15 cm in order to release the internal wires. It is advisable to leave a small margin for possible repair work in the future.
- Use pre-prepared multi-colored jumper wires.Their cross-section must be the same as that of the supply cable. It is not necessary to make the jumpers very long. They will prevent the block from "sitting" tightly in the nests. On the jumpers, you need to remove the braid by 1 cm.
- They pass all the wires through the technical connectors-holes in the socket boxes.
- The upper protective cover is removed from the dial-up block and the clamping screws are unscrewed by 5-6 mm. The first conductor is connected to 1 socket, taking into account the position of the terminals. Already from it, with the help of contacts, the PE conductor and all zero cables are diverted to the remaining sockets.
- All wired sockets are tightened neatly with the retaining screws without effort. The master must remember that the power line connections must remain non-separable.
- All bare sections of the wires are wrapped with insulating tape.
- It remains to insert the socket box with the supplied wires into the glasses and fix it using the side clamps.
- Level control the evenness of the block placement.
- The upper part of the kit is mounted last.
At the time of daisy chain connection, it is important to monitor the polarity of the contacts. The same cable is taken from the zero terminal. From the phase conductor - phase.
When fully assembled and installed, the wall unit should “sit” firmly and resist attempts to move it by hand.