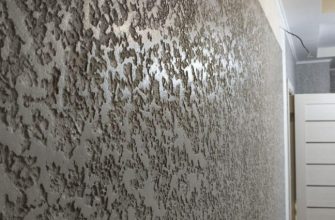
Basement siding is installed at the bottom of the house. The material is produced in different colors, using the pattern and embossing of natural stone, brickwork, wood, leather. Installation of basement siding is carried out taking into account the technological features of the cladding, which is located next to the ground surface. Finishing panels protect the bottom of the building from moisture, snow, shock.
Definition of basement siding

The concept of plating specifically for the basement is conditional. Siding strips can be attached to the plinth and finish the entire facade of the building with it. Use metal panels and vinyl.
For the lower part of the house, a profile with special characteristics is used:
- thickened wall;
- resistance to mechanical kicks, strollers, bicycle transport;
- inability to saturate and retain moisture;
- elastic coating on the outside, resistance to ultraviolet light, weathering.
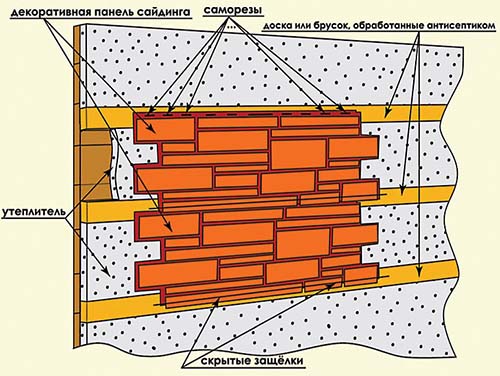
Together with the fastening of the siding on the plinth, a hinged frame is made for installing strips. Insulation is laid in the cavity of the frame to protect the basement from the cold.
Metal siding weighs more than vinyl siding, but in general, both materials do not put additional stress on the foundation.
Preparation and tools
It is permissible to fix the siding on the wall without lathing, if this does not require insulation from the cold. But it is difficult to find an ideal basement surface with even corners, therefore, for such a case, the bottom of a brick or concrete structure is leveled with plaster. More often, a crate is arranged for facing.
DIY siding tools for finishing the basement:
- construction knife, hammer, pliers;
- screwdriver, drill, puncher;
- grinder or circular saw;
- hacksaw for metal, scissors for iron.
Measurements on the walls and markings on the profile are made with a tape measure with a length of 5 m, control the installation of elements using a bubble, water or laser level. The verticality of the profiles of the crate is checked with a plumb line or level. To comply with the plane, you will need a nylon cord, which is fixed with self-tapping screws.
Complete set of basement siding

Additional details are used to finish the basement:
- J-planks on the plinth are used to join the outer and inner corners, but the joint is not too neat. Elements are used to reduce the cost, since they cost less than massive decorative overlays.
- Corner profiles. They form the corners after the installation of ordinary siding panels. There are elements for indoor and outdoor installation.
- A starter bar is attached at the bottom to hold the first strip of material. The quality of the cladding layer largely depends on the correctness of its installation.
Sections of panels are joined using a connecting H-strip. The element is also used to transition from one color of panels to another. At the top of the cladding, a finishing strip is mounted to receive the last strip of siding.
Choice of lathing
The support system is made of rigid and even elements.
Material used:
- wood slats with a section of 50 x 50, 50 x 40 mm;
- galvanized metal profile from the g / cardboard system (CD-60, UD-25).
The tree requires preliminary impregnation with several means with drying each layer. They take dry slats or dry them unfolded with a load under a canopy. For fixing, use ES staples with a length of 120 - 150 mm.
It is more profitable to put metal, since it does not lead to moisture, it is always even, and does not require preliminary processing. During operation, the material is not subject to corrosion, decay, fire.
Calculation of the amount of material
Each manufacturer produces different panel sizes. Minor differences exist in width, strip length, wall thickness.
Materials are calculated for finishing:
- frame elements;
- insulating films and insulation;
- siding and additional strips.
Draw a scan of the base on all sides on the sheet in order to correctly determine the volume of purchases. The sketch indicates the length, the height of the basement area on each wall, changes are made according to the marks if there are irregularities in the soil or the slope of the earth. Provide for color change, if any.
For frame

ES brackets are considered so that each rack is attached to at least two parts, but the distance between them should not be more than 60 cm. If the base is high, additional supports are placed in height.
The main elements of the frame are considered as follows:
- racks from a CD profile are placed every 60 - 70 cm from one another;
- vertical supports are also provided at the joints inside and outside the corner, double supports are installed there;
- elements are needed when arranging the entrance and door slopes that fall into the basement area.
In the basement frame, horizontal jumpers are not always placed between the racks. But if you need a strong cladding, additional beams from the same profile are attached at the bottom for the start and at the top for the finish. If insulated with mineral wool, profiles for the counter-lattice are calculated to create a ventilated gap.
For insulation
For insulation, consider:
- the main material, for this they find the general square of the base (multiply the height, length, add up the area of individual sections);
- the number of screw self-tapping screws with wide caps (fungi) is determined at the rate of 2 pcs. for every square meter.
The foam is purchased in 1 cylinder for every 15 running meters of the crate elements (the transverse ones are also taken into account).
Siding and accessories
To calculate the base material, you need to know the working area of each panel. The information is in the accompanying papers, or you can ask the supplier. The material is considered by area, but the square is taken not along the wall, but along the outer plane of the frame. Racks and cross members are placed remotely from the vertical plane of the facade.
The inner and outer corners are considered according to the actual height, while taking into account that such additional strips are produced with a length of 3.66 m. Determine how many corner strips will fit into this size, and whether the corners will need to be joined in height. The starting and finishing planks are counted along the perimeter of the plinth.
Installation procedure

Further step-by-step instructions:
- mineral wool insulation is placed on the wall, it is put on staples, making holes, which are then carefully packed;
- additionally fix the insulation with fungi, put waterproofing on top in the same way;
- place vertical drains from the profiles, fix them to the brackets with self-tapping "flea" screws;
- install horizontal jumpers;
- mount the starting strip, collect the surface with siding.
Before fixing the last strip, a finishing strip is installed in order to insert the upper trimmed or whole panel into it.Decorative corner overlays are attached to the corners.
Installing cladding on an uneven area
It is impossible to put the panels crookedly, therefore the installation of basement siding on a foundation with a slope is done according to certain rules. With a large slope of the site, the basement is divided into sections, so that each one is recruited according to its own scheme. An H-profile is used for separation.
More often they use another option, which consists in mounting strips from top to bottom. The start is set at the top of the base, then dial up, moving down. The last strip is cut to the required shape, for which it is tried on at the installation site, applying to the bottom of the base.