Air duct fastening can be done in several ways. They are mounted vertically and horizontally. It can also be installed in an inclined plane, but this is not often the case. Most often, they are attached to a wall or ceiling using special fasteners. How the air duct will be installed depends on the parameters of the main channel.
Duct fixation methods

The fasteners are chosen depending on the section of the hole and the place where it is necessary to fasten.
Types of fasteners:
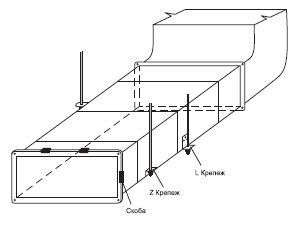
- corner bracket. Parts of the duct are fixed with a bracket using screws and screws;
- z-shaped holder. Used for rectangular sections. Fastened to each other with screws and screws;
- profile with pins. To ensure sound insulation, it is permissible to use a rubber profile;
- fastening with punched tape. Best suited for fixing the air exchanger in a circle. To make such a fastener, you need to make a loop and attach it to the bolt where the ventilation elements have connections. Among the advantages of this fastening method, one can single out a relatively low cost. The disadvantage is that the type of attachment allows vibration due to loose fixation;
- the clamp is ideal as a complement to the fixing with punched tape. It helps to reduce the noise level. They are used only for pipes that have a diameter of less than 20 cm;
- clamps are used in addition to a hairpin;
- fastening with anchors. To make such a fastener, you need to make a hole and attach it with a hairpin;
- traverses with studs. The method is suitable for fastening pipes with rectangular cross-sections and large dimensions. The air exchanger is supported by a cross-bar in this type of attachment;
- metal beam with a clamp and a hairpin, which is attached to it.
Mounting methods for horizontal ducts

If the installation is carried out on brick walls, or reinforced concrete surfaces, then the fastening is done with brackets in the form of a corner. They are inserted into the wall using shims. The part of the bracket that protrudes and has a hole is used to suspend the air exchanger. The embedment length varies according to the dimensions of the channel.
Methods for fastening air exchangers vertically
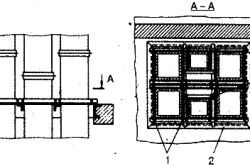
1 - places where welding was carried out, 2 - frame, 3 - corners
First of all, mark the places that are intended for fasteners. The next step is to install the details. The air exchanger elements are brought to the location where the installation is to be carried out. Next, attach the bracket, lift, console, block system to the outer wall. The structure with braces is assembled using single parts. The umbrella is being installed and the part of the duct that has already been assembled is lifted. The structure should be leveled with guy ropes and reinforced in a suitable position. The vertical duct is extended with:
- lower construction build-up;
- upper elongation of the air channel;
- use the extrusion method.
When it becomes necessary to enlarge the air duct on the outside wall, the first technology is used. To do this, use a winch with a cable that is lowered into the shaft or along the wall.Fastening is carried out using lifting mechanisms. Further, the air exchanger is mounted in stages. The link is lifted with a rope to the junction and secured. The remaining elements of the ventilation structure are mounted in turn. At the end of the installation, the winch is removed, and the remaining parts with the umbrella are reinforced.

When the structure slightly exceeds the weight for which the mechanisms are designed, the following method is used. All the necessary blocks are assembled, and large-sized elements are combined with the upper build-up. Initially, all parts are fixed on the supports separately, then, the next part is installed in the place indicated in the project. And from it the winch rope is lowered to the first element.
With the help of a winch, the cable is stretched, and the fasteners are removed from the first structural element and transferred to the next. There it is fixed with supports and the lifting assembly is removed. Such actions are carried out until the required build-up level is reached.
The extrusion method is used in order to conduct vertical air exchangers in hard-to-reach places. Initially, 2 winches with blocks are installed, fasteners are screwed into the walls. Part of the structure is assembled from elements, and the plate is attached to the lower flange with lugs. They are needed in order to stretch the cables through them. The assembled air exchanger rises until the top flange is visible above the building. Next, elements with an umbrella are attached, they are then attached with cables to the roof of the building.
Installation of rectangular air exchangers
- Fragments of fasteners and lifting mechanisms are exposed for work.
- The air duct rises in parts and is fixed in the place where it is needed.
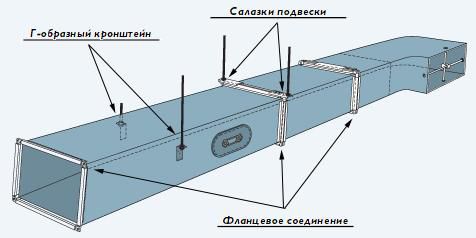
- For horizontal mounting, use traverses. Vertical - by capture.
- The adjoining elements are connected at the joints, while it is necessary to make a fastening for the rails, on the upper shaped tires.
- In hard-to-reach places, use composite planks.