Reinforcement of the floor slab is a responsible process, on the correct execution of which the durability and stability of the whole house depends. Underestimation of one of the factors or violation of work technology can cause serious complications, lead to costly repairs and even dismantlement of an emergency building. Reinforcement of a monolithic floor can be done by hand. It is necessary to study the features of the process, the rules for the selection and use of building materials.
Varieties of floors

In the construction of a house, you can use the following types of products:
- By type of construction. Subdivided into standard and monolithic. The first are concrete products manufactured at the plant and delivered to the site by truck. Lifting equipment is required to lay these slabs. A monolithic slab is cast directly over the supporting structures of the building.
- According to the purpose of the plate. It is customary to distinguish between floor and ceiling structures. Floor slabs are thicker and more durable. Structures of the second type are designed with minimum bearing capacity.
- By the shape and number of voids. There are slabs with voids of round and rectangular cross-section. The number of through holes can be up to 8 with a step of 5-12 cm between their edges.
The advantage of using standard plates is the high speed of their installation. Monolithic structures take longer to build, but their operational characteristics are higher.
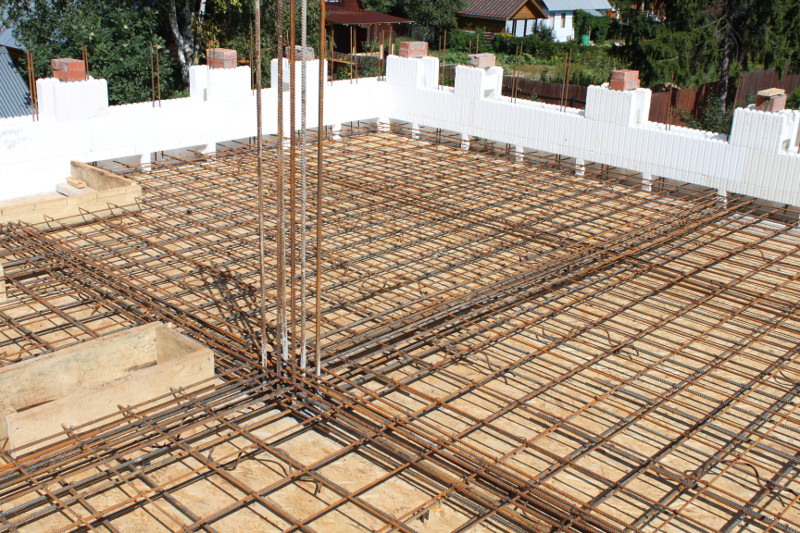
Arrangement of reinforcement in a slab

The layout of the metal elements can be as follows:
- Volumetric frame. The connection of the rods is carried out on open rectangular frames. The distance between the levels is determined by the calculated thickness of the slab.
- Lattice. The flat structure is made for ceilings made of reinforcement with a diameter of 10 mm or more. Such a plate is easy to assemble, but does not differ in strength and static.
- Grid. It is used when installing a floor-type ceiling, which rests on a solid base.
When making a drawing of a floor slab, it must be borne in mind that steel fragments should not protrude from the concrete. An exception is the project when the mortgages are intended for fastening the first rims of a bar in a wooden house.
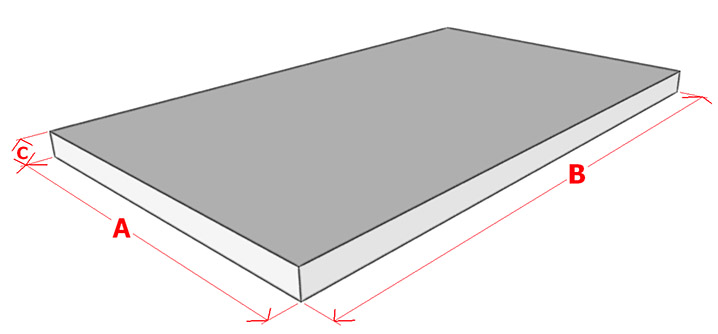
Calculation of the thickness and number of rows

When developing a drawing of a monolithic floor, they operate with the following indicators and values:
- maximum distance between load-bearing walls (cm);
- 30 - constant component;
- 1.2 is a special coefficient.
To get the optimal value, the first number is divided by the second, and then the result is multiplied by the third.
Example: 540: 30 × 1.2 = 21.6 cm.Add another 1.4 cm = 23 for perspective.
The number of rows is determined based on the fact that the bottom and top edges of the metal should be no closer than 3-5 cm from the edge of the concrete.Remains 13 cm - the best option for 2 rows of reinforcement.
Design features and schemes of reinforcement of a monolithic slab
Reinforced flooring is very popular in private construction, despite certain difficulties in installation.
Floor and ceiling tiles are distinguished by the following features:
- reliability and high bearing capacity;
- resistance to temperature and humidity changes;
- immunity to mold and mildew;
- the possibility of constructing a structure of any shape and size;
- even distribution of weight over the entire area of load-bearing walls and columns;
- the integrity of the slab, the absence of the likelihood of cracks, since there are no joints;
- long service life;
- the possibility of correcting such a defect as sagging using jacks;
- fire safety, fire retardant properties;
- rather high cost of the materials themselves and their delivery;
- long construction time, ranging from one month;
- attachment to warm weather without precipitation;
- high complexity of the process;
- the need for careful adherence to technology at every stage of installation.
When arranging a floor slab, it is allowed to combine reinforcement when installing the frame. The lower longitudinal layer can be made of iron rods, the frames can be used from plastic, and the transverse level can be made of fiberglass products.
Formwork and reinforcement assembly
With the right approach to work, you can achieve a result that will not be worse than using prefabricated plates.
Required:
- Bulgarian;
- roulette;
- crochet hook for wire;
- hacksaw for wood;
- plastic inserts and spacers;
- annealed wire or ties;
- level;
- formwork material;
- fittings;
- paint brush;
- anti-corrosion agent;
- hardware (nails, bolts, screws).
It is recommended to reinforce the floor in the following sequence:
- Carrying out calculations, drawing up a diagram, purchasing materials.
- Installation of supports for the horizontal part of the formwork. For this, pipes, racks are used, pillars of bricks and gas blocks are laid out.
- Installation of the site. Dense panels of plywood, sheet metal, slate or plastic are used. Joints are made on props, dense cellophane is laid on top of the platform. The edges are glued with tape.
- The base is leveled by installing spacers or adjusting the height of the posts. If you need to build pipes for communications, this is done at this stage.
- The frame is being assembled on the installed plastic beacons.
- Formwork is being installed. The previously laid cellophane is put on its sides. The edges of the frame are fixed with spacers to the formwork.
After that, the mold is poured with concrete. The surface of the mortar is leveled and smoothed.
It is not recommended to join the rods by welding, as this weakens the metal. Better to use wire or ties, although it is more difficult and more expensive. The cut points of the rods should be immediately cleaned and painted. Reinforcement from concrete is not allowed to protrude. Over time, it will begin to rust, gradually destroying the entire slab. Wooden props and spacers should not be used. Wood absorbs moisture and transfers it to the iron.


Without special knowledge, it is better not to take on the reinforcement of floor slabs yourself. It is necessary to clearly understand where certain stresses arise during loading, whether, depending on the spans, conditional beams (in non-girder floors) are required, or full-fledged beams, how the support zones are reinforced, where large transverse forces arise and the slab works for shear, which should be the overlap of the reinforcement rods when they are spliced, because it is impossible to cover all the details within the framework of a short article.
What kind of floor and ceiling tiles? What if you need to close a 12-meter span? Will you then use the specified method and accept the plate thickness of 48 cm? Why is additional reinforcement adopted in the lower reinforcement zone not in the middle of the span, where the maximum bending moments are correspondingly the greatest tensile forces?