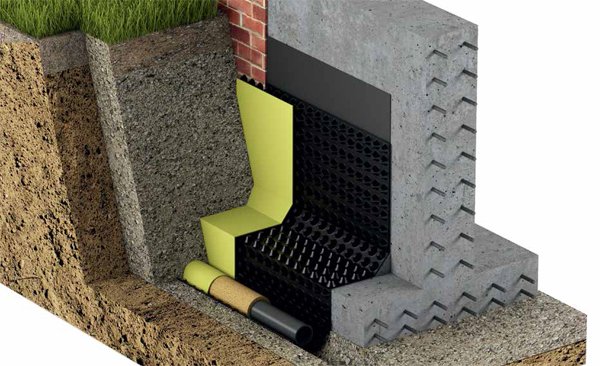
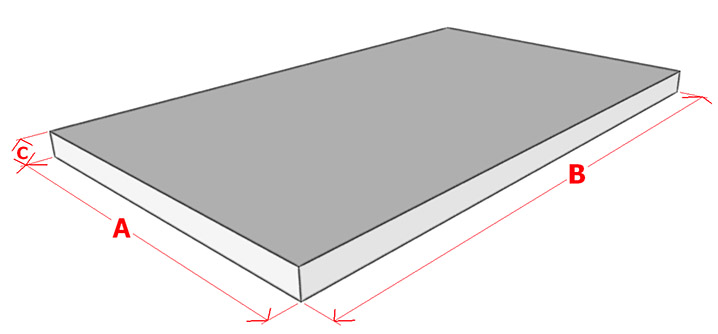
The Swedish insulated plate is a monolithic base for a small recess for a house. The USB foundation is built on a heat-insulating layer, therefore it does not come into contact with the ground. The slab is erected on any soil, the level of the ground water standing and the depth of freezing do not matter. Additionally, it becomes possible to carry out communications in the thickness of the base.
The device of the insulated Swedish plate
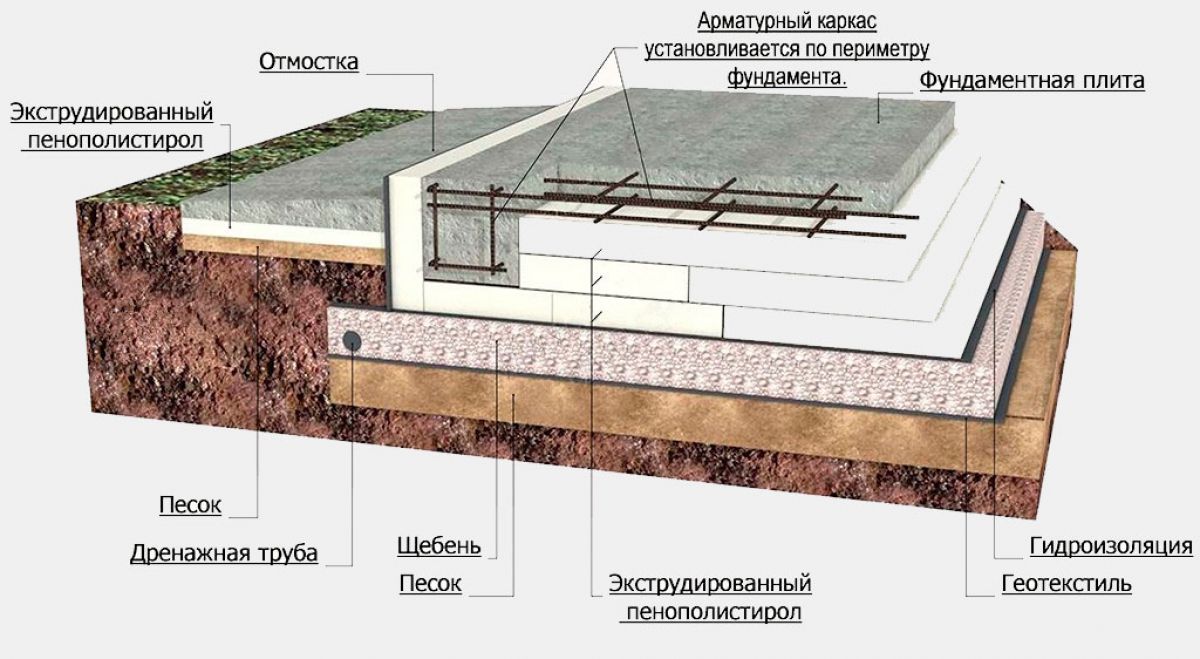
The complex structure is insulated with thermal insulation with water-repellent characteristics. The top of the monolithic slab is prepared for laying the floor of the first level of the house. Stiffeners are arranged under the walls along the perimeter.
Insulated Swedish plate (USHP) includes:
- drainage pipe system on the ground;
- geotextile;
- sand pillow;
- crushed stone bedding;
- insulation (extruded polystyrene foam);
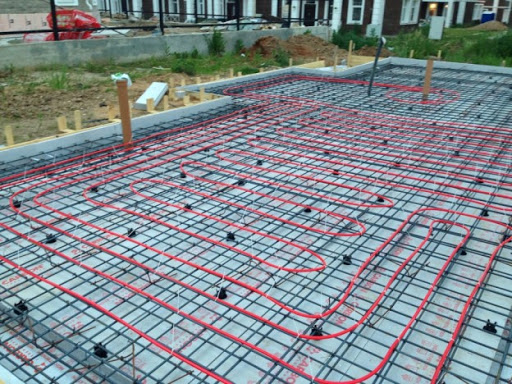
- concrete slab with reinforcement, heating and communications inside.
Sewerage, water supply, are laid in the body of the foundation, and floor heating is done using water pipes connected to the boiler. Heating is carried out evenly, so no radiators are required on the ground floor of the building. The warm floor is usually hidden in the screed, but in the case of an economical base, pouring is not needed.
The soil under the house does not freeze in winter, the soil does not swell with the onset of heat or in severe frosts. For concreting, insulated fixed formwork is used, which additionally preserves the internal energy of the room. Communication pins are calculated accurately and protrude from under the floor in the right places.
A drainage system is installed around the perimeter in conditions of high soil moisture. Water drainage is done in swampy areas and in areas with a high moisture content. The USB slab is on a dry basis, and the effluents enter the general sewage system or accumulate in separate containers.
Swedish designers have calculated the options for slabs depending on the type of soil, load on the slab, and took into account other factors of influence. Data on the choice of versions for building an insulated foundation is collected in technical catalogs with tables and drawings. The regulatory framework with a description was also compiled by German manufacturers of the KNAUF range of materials. You can use the catalog or entrust the design and calculation of UWB specialists.
Application area

Insulated structures are universal foundations; different types of buildings are erected on them. Monolithic slabs on a layer of insulation work well on unstable soils.
Types of soils for the construction of slab bases with insulation:
- sandy, sandy loam soils;
- rocky views;
- clay soils, loams;
- water-saturated areas;
- swampy areas;
- weakly bearing layers, for example, peat bogs;
- permafrost area.
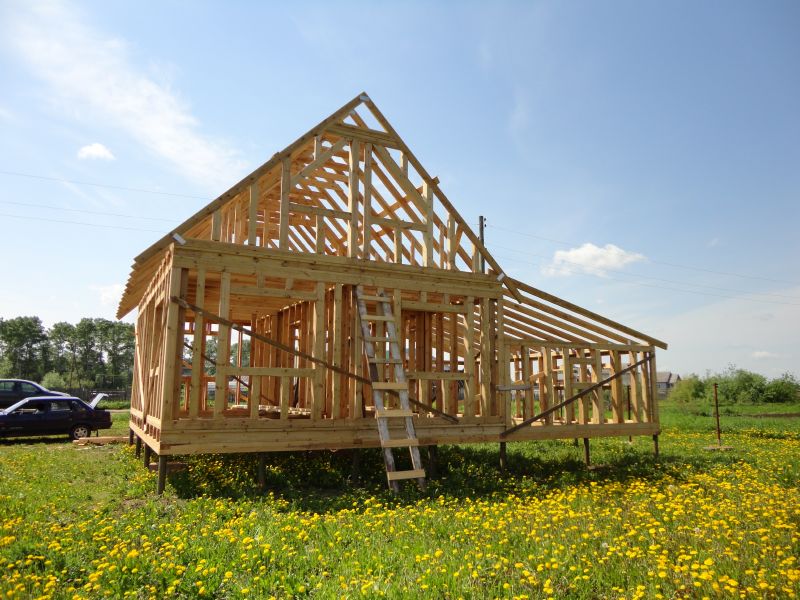
The type of soil is taken into account before starting installation. The vegetative layer of the soil is completely removed and replaced with sand and crushed stone bedding. In areas with a slope of the earth, it is necessary to build a pit or leveling the soil on a lowered part, the work is fixed with a retaining reliable wall. The Swedish foundation will serve as a support for one-story and two-story buildings.
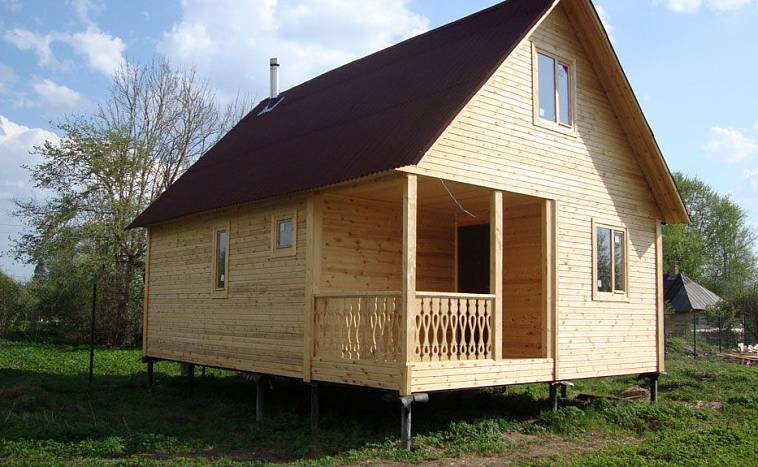
Cost effective slabs work well under buildings made of:
- logs and glued or rounded timber;
- timber lumber, SIP panels;
- shields (frame construction);
- brick, concrete;
- aerated concrete, foam concrete, cinder block.
Heat losses through the base are reduced using a slab foundation with permanent formwork, usually up to a third of the heat is lost in this way. The USP is a battery that keeps the temperature in the dwelling and heats the floor on the first tier. It is important to insulate with extruded polystyrene foam with a thickness of about 100 - 200 mm and install a warm floor.
Advantages and disadvantages
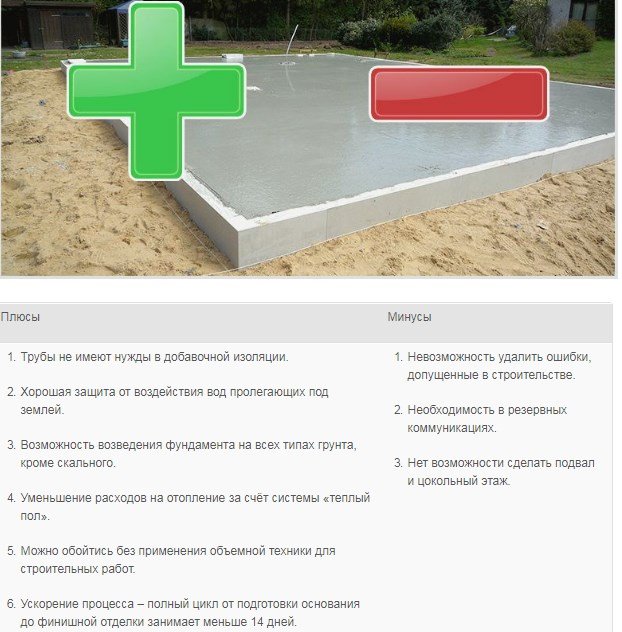
Advantages of using the UWB technology of the foundation:
- saving money on heating the house by isolating the foundation from the cold and reducing energy losses;
- there are no cold bridges, so the corners of the house and the basement part do not freeze;
- there is no shrinkage of the building during construction on soft soils, there is the possibility of building on any soils;
- reduction of construction time due to an integrated approach to the laying of communications and finishing works.
Difficulties in choosing a UWB or strip foundation arise due to the high price of materials and installation work. The installation of the slab is carried out by qualified personnel, since precision is needed in the production of communications, thermal insulation, concrete pouring and reinforcement. It is impossible to correct the mistakes of the builders, since the house has already been erected on the foundation. With your own hands, you can make such a base for a small structure, for example, a workshop, garage or bathhouse.
The disadvantage of USHP is that it is almost impossible to make a basement or garage under the house. If the thickness of the monolith is chosen incorrectly, over time, the slab will be squeezed through and the building will settle. Sewerage and water supply in the body of the base cannot be repaired, and the durability of the insulation layer is difficult to predict in advance.
List of required materials and tools
The stove can be arranged independently if you thoroughly study the USP technology, select tools and modern materials. For the construction, high-quality components are selected, since the Swedish insulated foundation is the basis of the entire structure and the ease of use of the house depends on its performance.
Materials for work:
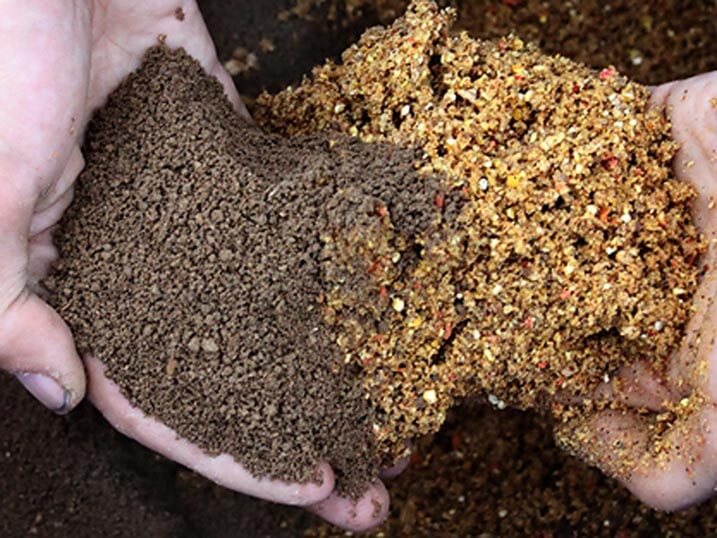
- medium-sized sand, sifted;
- crushed stone of fraction 10 - 20;
- geotextiles made of polyester or polypropylene yarns;
- slab insulation expanded polystyrene up to 200 mm thick;
- collectors for the drainage system;
- boards or fixed formwork;
- reinforcement for the frame;
- knitting wire or welding machine with consumables;
- sewage pipes, water supply;
- material for the underfloor heating system.
On the market there is for sale thermal insulation from manufacturers of the brands URSA, Technonikol, Penoplex, Styrex. Insulation materials that were pressed by extrusion are suitable; PSB-S insulation is not used because of this. The material must be reliable, durable, environmentally friendly and not absorb water.
Tool list:
- shovels, wheelbarrows, scrap, buckets;
- building or water level, level;
- drill, grinder, screwdriver, vibrator;
- hacksaw, wire hook, knife, pliers;
- concrete mixer.
To reinforce the stiffeners, a volumetric frame is made of reinforcement with a diameter of 16 mm, and clamps from a rod of 6 - 8 mm are placed every 30 cm. The metal does not protrude beyond the boundaries of the hardened concrete. The slab is reinforced with two steel meshes made of rods with a diameter of 12-16 mm, while the cell size is 15 x 15 cm. No utility pipes are placed in the stiffeners.
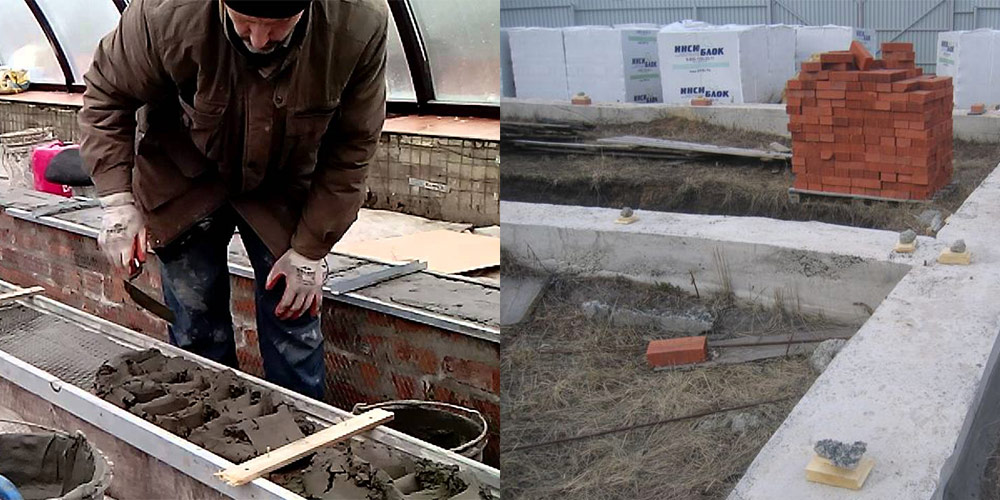
The main stages of the installation of the USHP foundation
DIY USB, step by step instructions:
- Soil development. A vegetative layer with a thickness of 30 - 40 cm is removed. After mechanical excavation of the soil, the bottom of the excavation is cleaned up to the mark.
- Geotextile is laid to prevent mixing of earth with sand, overlaps are made at the joint of 10 - 15 cm.
- Sand 7 - 15 cm is laid in the pit, crushed stone up to 15 - 25 cm is poured onto it. The layers are poured with water and compacted.
- The drainage system is being installed.
- Insulation is placed on the bottom and mounted around the perimeter from ready-made factory elements, cut to size, or the pieces are selected in place. Corner and rectangular fasteners are used for fixing. Wooden supports are installed from the outer part of the permanent formwork.
- The frame is cooked directly in the pit or prefabricated blocks are made of reinforcement, which are welded separately. They are installed in the formwork piece by piece and connected.
- Collectors and communication pipes are installed, underfloor heating is installed. The collectors are laid between the mesh bars.
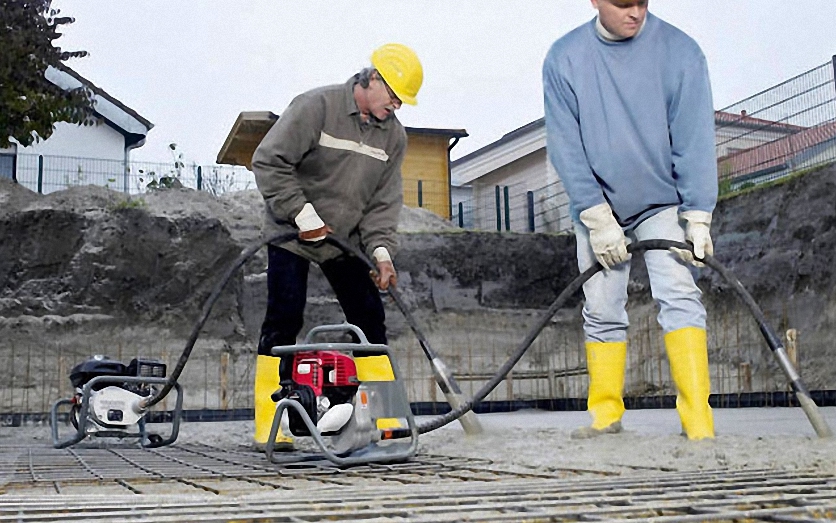
- The concrete is fed in layers and each layer is vibrated with a power tool to rid the mass of air.
The insulation layer is mounted in a checkerboard pattern with a shift of the joints in the vertical and horizontal plane. The end plates of the insulation are fixed with plastic dowels with wide hats (mushrooms). The seams are filled with foam glue for expanded polystyrene. The insulation is laid under the slab in 2 - 3 layers, and under the stiffeners it is made in one sheet.
Recommendations for the construction of the foundation
During installation, attention is paid to the quality of each layer to obtain a durable and strong structure. Sometimes the thickness of the sand-gravel bedding reaches 600 mm and depends on the bearing capacity of the soil itself.
Communication pipes are attached to the frame elements with plastic clamps. Under load-bearing walls and doorways, the collectors are put into corrugated sleeves or polyethylene pipes. Communications are laid strictly according to the project in accordance with the height indicated in the drawing. The elements are temporarily fixed with supports until the subsequent concreting.
The heating system is checked before concreting. The pipes are filled with energy, and the system is pressed to identify areas of leaks. The concrete is mixed or ordered after all the work has been carried out, and the brand of the mixture is indicated in the project. The mass is evenly distributed over the area of the slab using shovels, and with a trowel it is driven into difficult places.
Vibration is imperatively done for each layer to reduce voids in the concrete slurry. The mixture is kneaded in such a volume that it can be worked out in a couple of hours. Do not add water to increase ductility, as this will reduce the strength of the concrete.
If concreting stops until tomorrow, a step transition is made for the subsequent connection of layers, a vertical seam is not allowed. Before pouring it is moistened with water and cement milk.