When building houses with your own hands, the cost of materials and work, manufacturability and the possibility of independent arrangement of each structural element play a decisive role in choosing a project. Metal roofing is a beautiful and durable coating that meets many requirements. It is important to familiarize yourself with the characteristics of the product in order to calculate and purchase the required amount of roofing material, consumables and to carry out the installation correctly in stages.
- Description of metal products
- Specifications
- Advantages and disadvantages
- Metal roofing device
- Calculation of roof slopes
- Calculation of the amount of metal tiles and consumables
- Stages of installation on your own
- Required tool
- Installation of rafters
- Installation of the crate
- Installation of windproofing
- Arrangement of counter-lattice
- Metal tile fastening technology
- Types of additional elements
- Internal works
Description of metal products
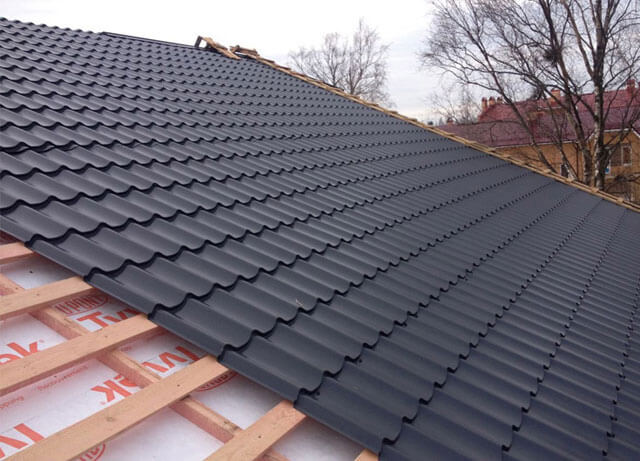
It is customary to call a metal tile profile steel sheets, on which a decorative protective polymer coating is applied. The shape of the profile resembles ceramic tiles, and the palette corresponds to the RAL color catalogs, which allows you to choose the desired shade.
Specifications
A high-quality metal tile must comply with GOST R 58153-2018 in terms of characteristics, production method and test results, which is called "Profiled metal roofing sheets (metal tiles)".
Products are made by the method of profiling and stamping of cold-rolled steel. The metal is necessarily subjected to "hot" or electrolytic galvanizing, and then coated with polymers.
The polymer coating is made of polyester, polyurethane or polyvinylidene fluoride enamel, PVC plastisol.
The standard thickness of steel sheets is 0.5–0.6 mm, which is the most common option. The premium class includes metal tiles of 0.7–0.8 mm. By special order, the factories produce steel profiles up to 1 mm thick.
In order to save money, products with a thickness of 0.35–0.45 mm are purchased for auxiliary buildings in the yard. Such material is produced according to TU, it is cheaper, but it is inconvenient to work with it - it crumples if handled carelessly. The durability of the tiles is below standard.
Important characteristics for calculating metal roof tiles are:
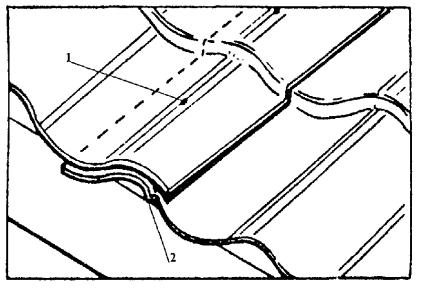
- total width and length of the sheet, measured from edge to edge;
- the overlap in width is the area that will be overlapped by adjacent sheets when fastened;
- useful width and length of the sheet, taken into account when calculating the roofing scheme;
- height and pitch of the profile.
Each manufacturer has the right to independently set the geometric dimensions of the sheets, but most often the total sheet width is about 1200 mm, and the mounting width is about 1000 mm.
The exact dimensions must be checked with the seller.
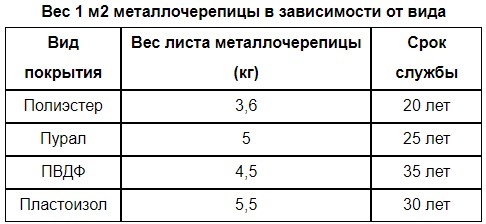
The weight of the metal tile is from 3.5 to 5 kg / m2.
Advantages and disadvantages
As a building material, metal tiles have positive consumer qualities:
- light weight, which allows you to save on the arrangement of the foundation, walls, rafter system;
- ease of installation;
- resistance to any climatic conditions, immunity to precipitation, hail, air temperature and ultraviolet light;
- structural strength due to the metal base and stamped profiles, which are stiffening ribs;
- the availability of additional elements necessary for a complete complete set of the roof in a single style and color scheme;
- incombustibility;
- ease of adjustment to the desired size using metal scissors, a hacksaw, a jigsaw;
- the ability to arrange a roof with a small angle of inclination - the material can withstand heavy snow loads;
- durability - an average service life of 20 years, and for products with a polyurethane coating, a guarantee for rust penetration up to 50 years.
You cannot cut the tiles with a grinder, under the influence of high temperature the coating loses its properties, it becomes possible for the rapid spread of rust.
In addition to the advantages, the material has some disadvantages:
- low sound insulation;
- the need to equip hydro and vapor barrier when installing a warm roof;
- treatment of places of cuts with an anti-corrosion compound is required;
- a large amount of waste when arranging a roof of a complex shape;
- high thermal conductivity, leading to rapid cooling of the premises in winter and heating in summer.
Care must be taken when transporting, sheets may be bent or scratched.
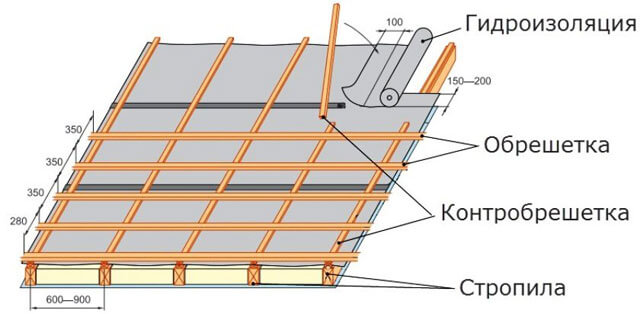
Metal roofing device
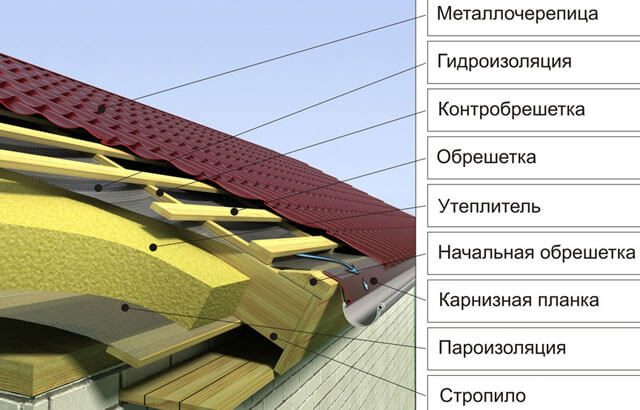
Builders distinguish two main ways of arranging the roof;
- warm metal roof;
- cold construction.
The differences lie in the composition of the “roofing pie”.
In a warm construction, the layers are arranged in the following order:
- A filing made of boards, lining or siding for rough or fine finishing of the attic or attic.
- The rafters, which take the load from the roof, distribute it evenly along the perimeter of the walls.
- A layer of vapor barrier material. It is necessary to protect thermal insulation, steel sheet and rafters from condensation that appears on the attic or attic due to temperature differences.
- Heat insulator, which is used as mineral wool, expanded polystyrene and similar materials.
- The main lathing is made of boards with a thickness of 25 mm, which serves as the basis for the tiles.
- Waterproofing membrane, to protect the insulation from possible penetration of precipitation, blowing out the insulation.
- Counter lattice 4–5 cm thick to create a gap necessary for ventilation and fastening of sheets.
- Metal tiles.
In the cold roof version, there are no two layers: a vapor barrier and insulation. The filing is done if desired.
Calculation of roof slopes
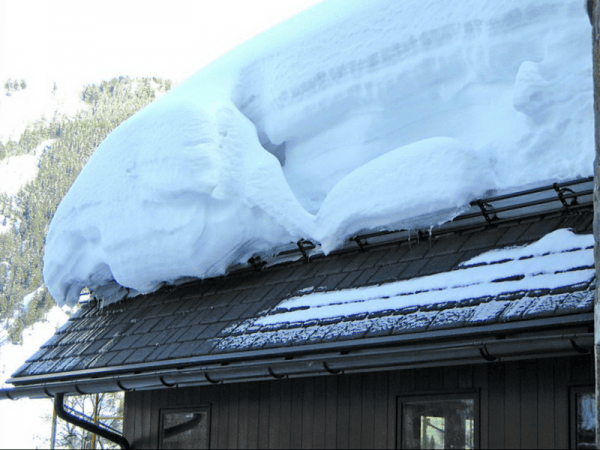
When designing, an important parameter is the slope of the roof slopes, usually measured in degrees. It is necessary to select the optimal parameter to avoid operational problems.
On a low slope:
- A lot of snow collects on the roof, which is not blown away by the wind and does not roll off when it melts.
- The load on the metal tile, rafter system and counter-lattice increases, placing increased demands on their strength.
- The likelihood of leaks through the joints from melting snow or heavy rain increases.
- The height and volume of the attic or attic room decreases, which is important if living quarters are made there.
On the other hand, a small angle will require less materials as the ridge is lower and the roof slopes are shorter.
The low slope option is suitable for southern regions and areas with a small amount of snow load.
With a large steepness of the roof, the consumption of material increases, which affects the final price of the building.
It is necessary to choose an intermediate option if the financial component is critically important when building a house.
According to operating experience, the slope is considered the best option:
- 20–30º for pitched roofs;
- 20-40º for gable structures.
The minimum roof slope allowed by SNiPom for a slope with a length of 6 m cannot be less than 12º, but it is applicable for areas with no heavy snow load.
Calculation of the amount of metal tiles and consumables
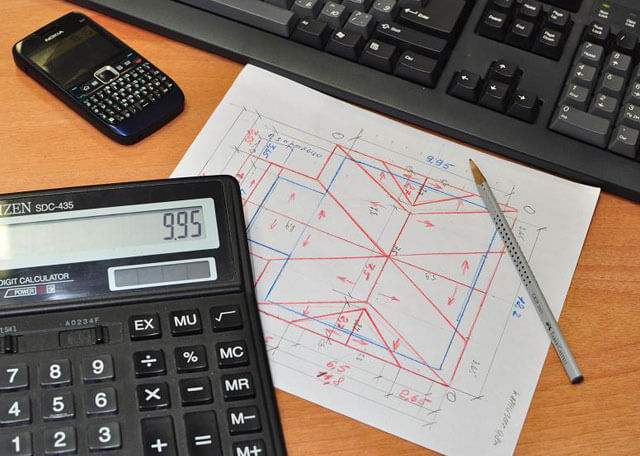
On the Internet, you can easily find online calculators for calculating the material and consumables necessary for arranging a warm or cold roof.
Manufacturers make calculations for their material. The geometric full and useful dimensions of the sheets may not coincide for different companies, which leads to the purchase of excess metal tiles or their shortage and the need for additional costs for the delivery of missing elements.
Using school knowledge from the geometry course, it is easy to find out the amount of material needed.
The calculation is performed step by step in the following sequence:
- Calculate the total roof area. The length of the house is multiplied by the length of the ramp.
- Focusing on the useful area of the metal tile, they find out the required number of sheets.
- Measure the total length of the ridge and drainage extensions.
- The required number of fasteners is calculated. For each square meter, the consumption will be: 6-8 roofing screws that will fasten the sheet and 4-5 for installing drains.
When calculating, one should take into account the possible cuts of the tiles when arranging the ridge and overhangs - the dimensions and stamping of the sheets may not correspond to the parameters of the roof.
To check independent calculations, it is necessary to make a control layout of the sheets according to the drawings.
It is better to purchase shingles from a local large seller who will make an independent calculation of the material according to the house drawings. If you need to buy, there is no need to search for the required material.
Stages of installation on your own
Store metal tiles under a canopy or indoors. It is important to press the sheets tightly with a heavy object so that the wind does not lift the parts into the air and carry them away, which will certainly lead to damage to the sheets.
Required tool
To install a roof made of metal tiles, you will need the usual set of carpentry tools:
- hacksaw or jigsaw;
- hammer, plumb line, tape measure, marking cord, level;
- scissors for metal;
- screwdriver with bits for roofing screws;
- safety equipment when working at height - a safety belt and helmet, a respirator and gloves when installing a heater.
In addition, it is necessary to purchase an anti-corrosion compound for lubricating cuts on sheets.
Installation of rafters
For roof beams, a beam with a thickness of 50 and a width of 100 mm is used. The choice depends on the configuration of the roof, snow and wind loads, the mass of the "pie" of the roof.
Installation step from 500 to 900 mm. It is advisable to choose such distances between the rafters so that it is 1–2 cm less than the size of the intended insulation. For example, the standard size of stone wool is 600 mm wide, so 58 cm is left between the rafters.
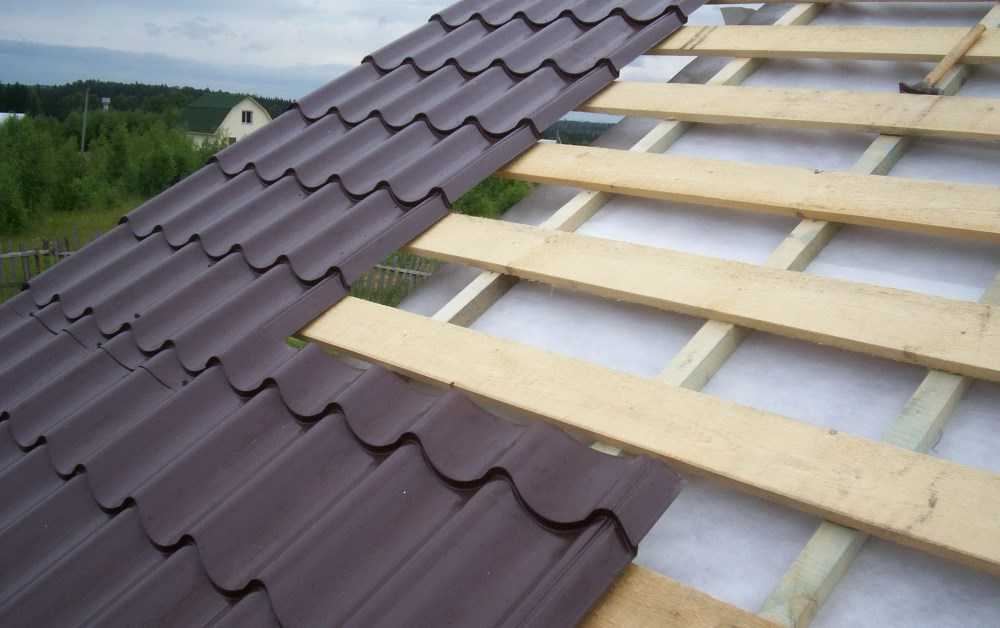
Installation of the crate
For the lathing, an edged or unedged board with a thickness of 25 mm is used - a smaller size will not allow you to securely fix a self-tapping screw, a larger one will make the structure heavier and more expensive.
The lathing can be solid or sparse. In the second case, the boards must be fastened so that the hollow of the tiles coincides with the location of the board - this will make the structure more rigid.
The most common lathing pitch is from 250 to 350 mm between the sides of the boards.
It is unacceptable to use boards of different thicknesses - after installing the tiles, distortions will appear.
The bottom board is fixed strictly along the edge of the cornice. Before or after fixing, the wood is treated with preparations that prevent decay and fire retardants, which make the boards slightly combustible.
Installation of windproofing
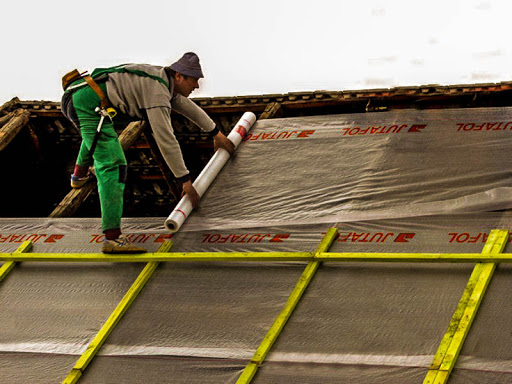
Any roll materials intended for these purposes are used for waterproofing.There are special membranes on sale in the form of thin films or non-woven material - they are easy to use.
During installation, it is necessary to overlap the sheets by 10-15 cm in order to exclude the penetration of moisture through the joints.
The insulation is fixed with a construction stapler. Additionally, the sheets will be reinforced with a nailed counter-lattice.
Arrangement of counter-lattice
Counter-lattice slats are fastened with nails and self-tapping screws. Be careful not to damage the vapor barrier.
The counter lattice must be placed perpendicular to the lathing. Marking is done in advance so that the fastening points of the self-tapping screws coincide with the lower bulge of the tile and the rail line.
Metal tile fastening technology
Installation begins from the lower left corner of the slope, then the bottom sheet is laid to the right of the first.
After installing the first row, they begin to fasten the second one also on the left side, etc. The bottom of the first sheet is fixed in each groove of the tile. Next, the screws are screwed in in a checkerboard pattern. Two adjacent sheets are fastened along the upper wave with short fasteners.
Types of additional elements

The installation of the external part is completed by the installation of additional elements:
- strips of abutment to ventilation pipes;
- snow holders;
- valleys and corners to protect corner structures;
- ebb tides;
- skate.
During installation, you may need wind and eaves strips, depending on the configuration of the roof. The elements are fastened with self-tapping screws.
Internal works
When arranging a warm roof, after fixing the tiles, they begin internal work:
- the insulation is fixed between the rafters;
- nail a vapor barrier membrane;
- fix the interior decoration - drywall, tongue-and-groove boards, wooden lining.
The technology of installing a roof made of metal tiles is simple. The work is available for independent conduct, subject to the technology and safety rules. The roof is beautiful, durable, suitable for use in any region.


