Ideally, a private or country house is designed and built at once with all the auxiliary and adjoining premises to the main building. However, in practice, this is not always the case. This may be a planning mistake, lack of experience, lack of finance. Do-it-yourself adding a veranda to a country house is a completely feasible event available to almost everyone. It is necessary to approach it from all sides thoughtfully and competently, to correctly determine the project and the choice of materials.
Choosing the type of veranda
A veranda is a light, adjacent to the house extension without internal partitions. The room has various sizes and configurations, which is justified by its purpose, design, as well as the dimensions of the main building. In most cases, structures have different support systems, which implies that there is no hard contact between floors, walls and roofs.
By the type of device, verandas can be conditionally divided into the following categories:
- Open. They are lightweight structures with a minimum set of enclosing and protective structures. You can add a terrace to the house, which contains only a floor, a roof and a few thin supports. Such places are great for relaxing in the warm season, while there is effective protection from sunlight and precipitation. Open-type annexes can be supplemented with light railings, which rather serve as a decorative function.
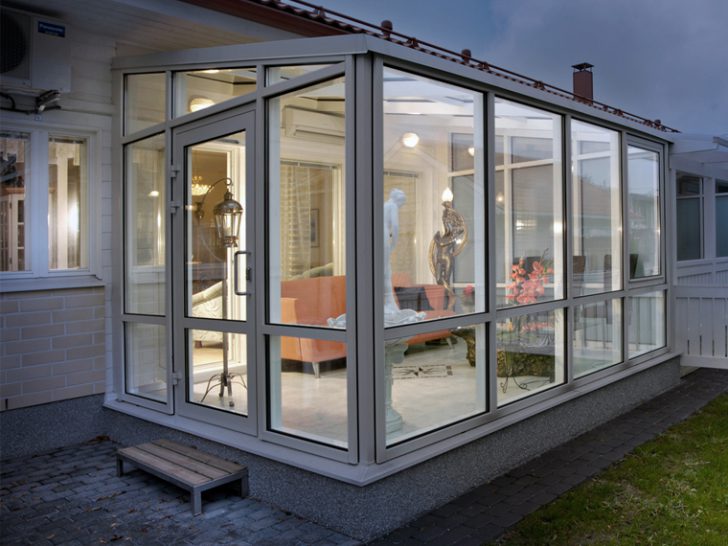
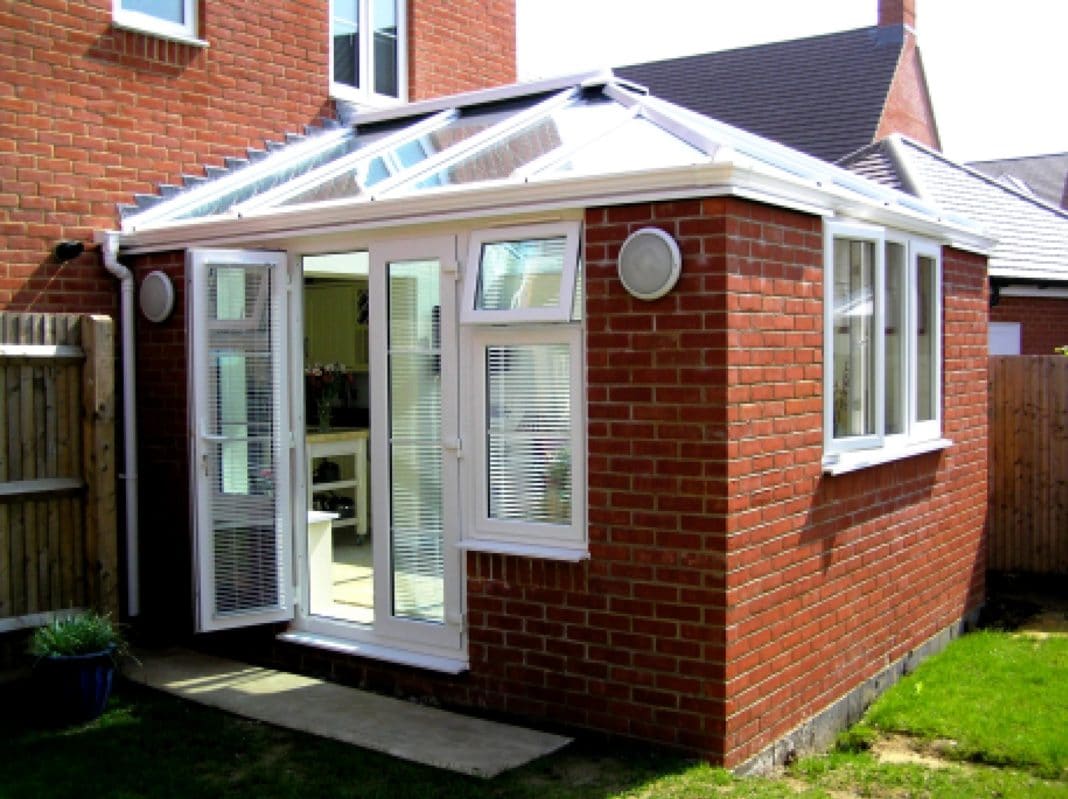
- Closed. The attached frame veranda to the house can be of the insulated and cold type, which determines the seasonality and comfort of its use. Such premises have all the features inherent in a residential building - an entrance door, walls, ceiling, floor and windows. Glazing can be standard and panoramic, transparent, mirror and tinted.
Based on the selected type of extension, the choice of its external design also differs. When a wooden veranda is attached to a brick house, the appropriate furniture is selected from natural materials. Also with the finishing of the floor, walls and ceiling - since the room is closed, you can not be afraid of dampness, and in the case of heating - and cold.
Planning and legalization
Even private construction implies registration at every stage. A self-erected structure is considered illegal and can be forcibly demolished. To attach a veranda to the house, it is necessary to draw up a competent project and coordinate it with the authorities concerned. The package of documents should include a site plan, a diagram of the house and a detailed drawing of the extension. If provided, the passage of communications is indicated.
When preparing a project, it should be borne in mind that representatives of the BTI, SES, fire supervision, architecture, nature conservation and the local authority put their visas on it. After the veranda is attached to the brick house, its parameters will be checked for compliance with the declared ones. Therefore, it is necessary to think over everything from the beginning so as not to change plans during the construction process.
The best option is the allocation of 4 m² for each tenant of the house. If less, the room will be cramped, and more - deserted, the cost of construction and cleaning time will increase.At the same time, the depth of the veranda should not be less than 3 m, so that it is possible to put furniture, household appliances and leave room for free movement.
You should think about where it is better to attach a veranda to a wooden house. It doesn't have to be a facade with an entrance. The structure can be erected against any wall of the main block.
Many summer residents prefer to attach a brick terrace near the kitchen window. Such a solution greatly simplifies the process of setting and cleaning the table, provides privacy and protection of guests from prying eyes.
Selection of materials for the construction of a veranda
Building codes and regulations do not regulate the types of materials from which it is allowed to make verandas and terraces in the country. There are only requirements - strength, reliability, fire safety and environmental friendliness.
The following options meet all these criteria:
- Wood. The material is natural, it is distinguished by its excellent appearance, the ability to pass moisture and ease of processing. For the construction of outbuildings, monolithic, profiled, glued beams and rounded logs can be used. Each type has its own pros and cons. The disadvantage of wood is its high cost, strong shrinkage and susceptibility to decay. The latter disadvantage can be successfully combated with antiseptics.
- Brick. The best option is considered to be products made of fired clay, which have high strength, durability, resistance to dampness and ultraviolet light. Brick structures look solid and monumental. As a minus, one can note the large weight and complexity of the masonry. For heavy walls, you will need to build a strong foundation.
- Foam block. The material has a number of positive characteristics: excellent thermal insulation, light weight with large dimensions, almost perfectly smooth edges. Thanks to this, construction is carried out quickly, without much effort. There is also a minus - aerated concrete is hygroscopic; high-quality waterproofing finishing is required for the walls.
Each type of material requires a specific set of tools, fasteners and consumables.
Features of erecting a veranda with your own hands
The reliability and safety of the attached veranda is determined by the quality of its connection with the main building. The best option is to equip your own support system. In this case, when the ground moves and its own subsidence, both objects will move independently of each other. The space between the walls is filled with elastic insulating materials and closed with a decorative plug.
When planning and during the construction process, the following nuances must be taken into account:
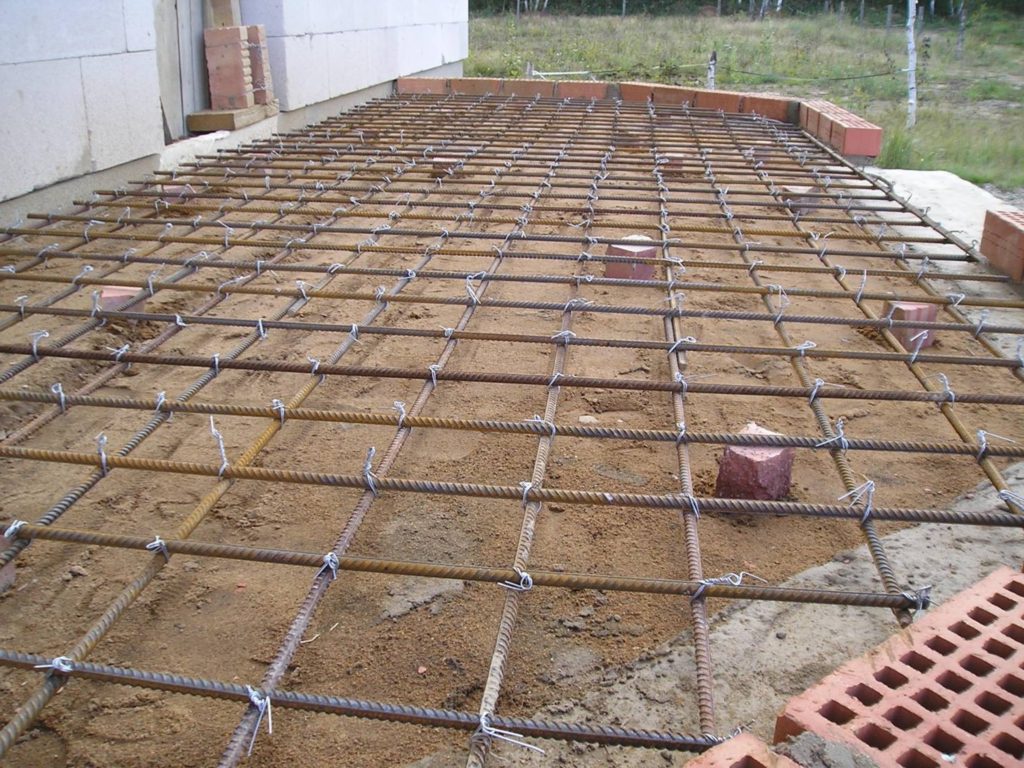
- Creation of the foundation. The choice of support system depends on the configuration, the weight of the extension and the type of soil. It is necessary to take into account the depth of its freezing. For a heavy structure, it is advisable to make a strip foundation or a monolithic slab. In the manufacture of lightweight structures, you can stop on a pile or columnar base.
- Installation of subfloors. The basis can be a reinforced concrete slab or timber flooring, laid on beams (reinforced concrete grillage). The concrete is leveled, if necessary, polished and treated with a deep penetration primer before the finishing coat is laid. The wooden base is leveled with a plane and then impregnated with an antiseptic, fire retardant and hydrophobic agent.
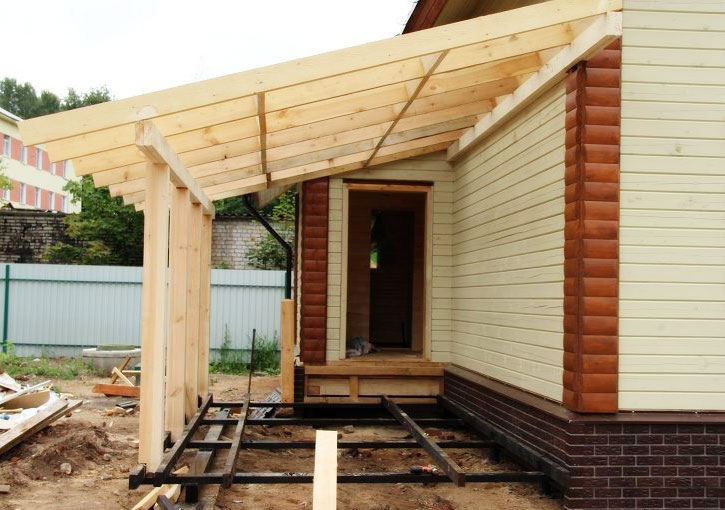
- Erection of the frame. This structure is made when erecting walls from shields and panels. The frame is made of 100 × 200 mm timber or metal CD and UD profiles. It is better to use a profiled beam so as not to fear that it will lead when the air humidity changes. The distance between the posts is taken in such a way that the frame can be sheathed with a minimum amount of trimmings.
- Roofing cake.The number of roof layers is determined by the choice of cladding. For polycarbonate, only bearing profiles are made. If ondulin, slate and profiled sheet are installed, it is advisable to lay a steam membrane, insulation and a rigid base under the roofing.
- Wall cladding and window installation. For cladding, there are many solutions that are interesting in all respects, expensive and budgetary. Suitable for interior decoration laminated MDF, plastic panels, wood paneling and drywall. In the latter option, you will need to work hard with sealing joints, plastering, sanding, priming and then applying a topcoat. From the outside, an excellent solution would be plastic siding, stylized as wood, stone or brick. You can make window frames from a bar, order ready-made metal-plastic products, or choose a removable version of polycarbonate.
Do not forget about the design of the finished veranda. For this, wood and forged products are used, various techniques of landscaping, coloring and laying out bas-reliefs.
Frame veranda
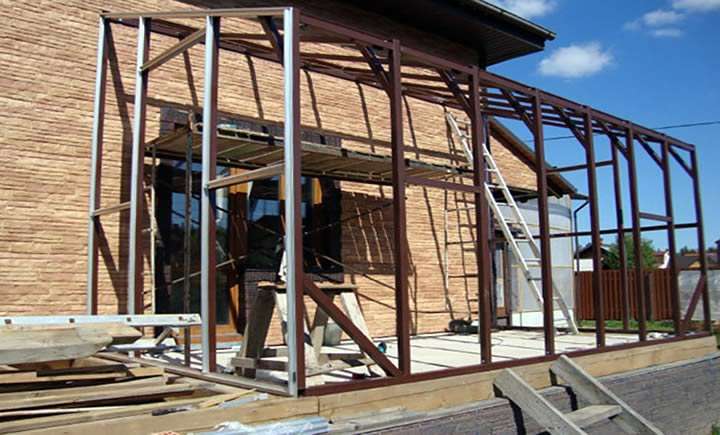
It is necessary to attach the veranda to the main object as close as possible in order to exclude the penetration of drafts and moisture. The fastening of structures should not be rigid.
Step by step construction process:
- Drawing up a sketch, project, approval. Calculations, preparation of tools, purchase of materials.
- Marking on the ground, determining the place for the installation of the support system.
- Digging holes, trenches or excavations. In the case of screw piles, the production of pits. Leveling the bottom of the pits, laying drainage fabric and cushions of sand and gravel.
- Installation of formwork (as provided) or screwing in screw piles. Assembling and placing the steel frame in the formwork and pipes.
- Mixing and pouring concrete into molds, carrying out compaction of the solution. Waiting for the concrete to mature.
- Laying waterproofing and, if necessary, thermal insulation.
- Installation of the frame. First, a double strapping of timber impregnated with antiseptics is laid. Installation of vertical supports, top rail and crossbars.
- Wood treatment with an antiseptic and hydrophobic agent. If the frame is made of metal, then the cutting and drilling areas should be painted. Laying of electrical cables.
- Installation of insulation. The best option is considered to be basalt wool, which surpasses analogues in almost all respects. Fastening the vapor barrier on both sides of the frame. Wall cladding.
- Roof frame fabrication. If provided - laying insulation and membrane. Installation of roofing. Ceiling installation.
- Installation of windows and doors. Fitting and adjusting the opening mechanisms.
- Completion of finishing works. Wallpaper gluing, tile laying, panel installation.
- Connecting sockets and switches.
It remains to decorate the room, install furniture and mark the completion of construction.


